|
Fuel Injection, Fuel Pump Technical Tips, 1986-90 5000/200TQ, 1991 200TQ 20V
FUEL PUMP REPLACEMENT GUIDELINES
Here is some information regarding fuel pump replacement on the 1986-88 5000 Turbo/Turbo Quattro and 1989-90 200TQ, 1991 200T FWD and the 1991 200TQ 20V series cars.
DO NOT ATTEMPT THIS REPAIR JOB IF YOU ARE NOT AN EXPERIENCED MECHANIC OR AUTOMOTIVE TECHNICIAN!
EXTREME FIRE HAZARD!
GENERAL CAUTIONS: Do this only in a well ventilated area and make sure there are no appliances that can be an ignition source in the vicinity (Gas water heater, gas or electric dryer, electric or gas room heater). I like to only use a flashlight or a florescent drop light to look down inside the tank.
Do not use a regular drop light with incandescent bulb as they can be very dangerous when working around gasoline if the bulb breaks and it provides an ignition source for the gasoline vapors.
I do not recommend that anyone attempt to replace the fuel pump with more than 1/8 of a tank of gas.
You should prop open the trunk lid, to ensure it does not close on you while you are inside the trunk.
Disconnect the negative terminal on the Battery
Have an approved fire extinguisher nearby
Wearing protective gloves designed for immersion in gasoline or solvent is highly recommended when performing the pump replacement. Don't use the regular latex rubber gloves, they may come apart when immersed in solvents or gasoline and could contaminate the fuel inside the tank. There are several types of gloves available that allow immersion into solvents and gasoline so make sure you use the correct type. Nitrile or Neoprene type mechanics gloves are available which are reported to be compatible with solvents etc. FOLLOW THE APPROPRIATE BENTLEY MANUAL REPAIR PROCEDURE FOR YOUR SPECIFIC AUDI TO REPLACE YOUR FUEL PUMP.
NEVER ELECTRICALLY TEST THE FUEL PUMP WHEN IT IS OUT OF TANK!
ELECTRICAL SPARK CAN IGNITE GASOLINE SPRAYING OUT OF THE PUMP!
EXTREME FIRE HAZARD! Locating the fuel tank access panel: On the Sedans inside the trunk toward the front raised area, there is a round access panel slightly offset from the middle, underneath the carpet.
The Wagons or Avants require you to fold the rear seats forward, then remove the fold up rear storage cover (Two 17mm and 13mm bolts) and remove 2 Phillips screws holding the carpet down. The round access panel is under some sound deadening material.
On all vehicles once you pull back the carpet you can gain access to this round access panel which is held down with three screws and has some electrical cable going through it. Removing this plate allows you to disconnect and remove the gas gauge sending unit to gain access to the fuel pump in the bottom of the tank. There is a locking ring that must be rotated counter-clockwise to remove the sending unit. See link to photos below.
The sending unit has two fuel hoses connected to it coming out of the top and one small vent hose. These need to be removed. The pressure line has a banjo fitting bolt.
NOTE: There will be residual pressure in this fuel line so use caution when loosening this fitting, use a rag to catch any sprayed fuel.
The other larger hose with a clamp is the return fuel line, the smaller hose is a vent hose.
Once the two hoses and banjo fitting are removed, the outer lock ring can be turned and removed to allow removing the fuel tank sending unit. There is a factory tool available for loosening this lock ring, but some mechanics just use a brass punch and hammer to knock this retaining ring counter-clockwise to loosen it. Using the brass punch helps to avoid making sparks that may ignite the gasoline that leaked from the pressure fitting.
After removing the lock ring, the sending unit can be pulled up partially to gain access to the two fuel lines (pressure and return) and the electrical connector.
I like to remove the electrical connector, the return line hose and clamp and then use a wrench to remove the main pressure line from the sending unit. Be careful when removing these two internal hoses and the electrical connector as the plastic can be brittle on the sending unit. Removing the two internal hoses and electrical connector allows the sending unit to be removed from the tank and to get it out of the way. This is a little tricky working the sending unit float out of the hole without damaging anything.
Before removing the pump, look down inside the tank and note the orientation of the fuel pump and pressure line with the electrical wiring.
You need to remember this orientation to make sure the pump is installed correctly to avoid fouling up the operation of the fuel tank sending unit float arm. The fuel tank sending unit float arm can get caught up in the hoses or wiring if the pump/hoses are installed incorrectly.
1986-88 5000T/5000TQ, 1989 200T/200TQ before VIN 44-K-067000 and 1989 Audi 100 before VIN KN 100000
The fuel pump is located inside the fuel tank, on the bottom right
side. On the 1986-88 5000TQ and on the 1989-90 200T/Q prior to VIN #
LN067001, and 1989 Audi 100 prior to VIN # KN 100000, the pump is inside
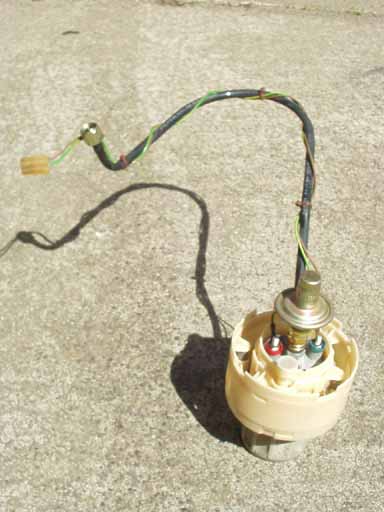
a triangular shaped plastic mount with 3 rubber support bushings as
shown below. On the 1986-88 5000TQ and 1989-90 200TQ, to remove the pump with attached hose and wiring, you need to simultaneously release the three plastic tangs with your fingers while simultaneously pulling up the fuel pump out of the retainer in the bottom of the tank along with the fuel line and electrical wiring.
Once the pump is out of the tank, move the pump to a well ventilated area where the pump can be disassembled from the plastic mount. Note the position of the pump inside the mount and note the orientation of the wiring and the fuel line before disassembling the pump.
On the pumps with the triangular shape plastic mount, there is a screw clamp that is loosened to allow removing the upper and lower plastic retainer from around the pump, note the location tang on the pump when installing the new pump.
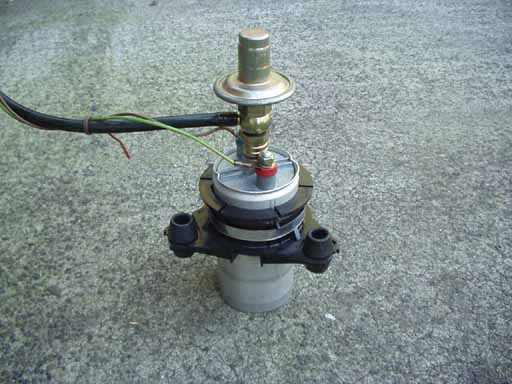
The photo below shows the Pierburg replacement pump as a 43mm diameter unit complete with the plastic spring pin adapter to fit the old 60mm mount and with integrated wiring. A cap nut is used to connect the original fuel line banjo fitting at the top of the pump. The pressure damper is no longer used with these pumps.
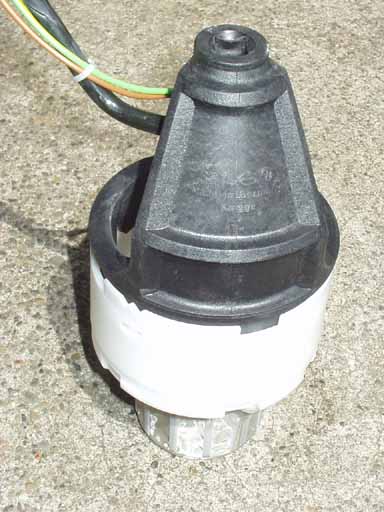
Note: The original style 60mm Bosch pumps may still be available. The later 1989 200TQ with Turbocharged 10V MC Engine after VIN KN 067001, 1989 Audi 100/Q after VIN # KN 100000. The later vehicles have a different pump mounting as shown below. These vehicles uses a reservoir that has a bayonet type mount and requires a special tool Audi #3214 to twist the reservoir to the left and unlock it from the bottom of the tank. The photo on the right shows the 3214 on the pump reservoir. Note: The 3214 tool may no longer be available.
These later 1989-91 200T, 1989-90 Audi 200TQ's, and late 1989 Audi 100's, require the use of the 3214 tool to twist the pump reservoir housing counter-clockwise 1/2 inch to unlock the reservoir so it can be pulled up with the pump. The 3214 tool has to be slid over the fuel line and pump wiring and engaged over the plastic reservoir tangs.
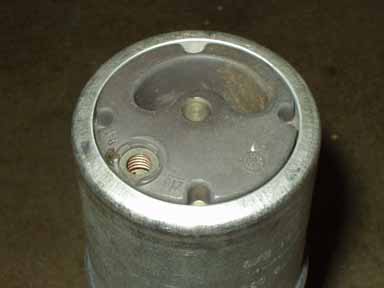
These vehicles were originally equipped with the 60mm diameter pump that has a lower screen that has a bayonet mount. Twist counterclockwise to remove this screen to allow the pump to drop down out of the reservoir.
These later vehicles require a new 43mm pump and new plastic reservoir with integrated screen, a fuel fitting cap nut N 011 069 1 and 2 metal sealing washers N 013 812 8. The cap nut is used to connect the fuel line to the 43mm pump with 2 new sealing washers instead of the original pressure damper.
Most replacement 43mm pumps come with this cap nut. The electrical connections on the pump use different size lugs so connecting them wrong should not be a problem. Some new pumps require you to install new terminals.
The 43mm replacement pump is inserted from the top down into the new plastic reservoir housing with the suction port on the pump bottom correctly orientated to poke out the bottom of the reservoir housing correctly.
There is also the O-Ring that seals the fuel gauge sending unit to the tank, N 901 833 02. The fuel line connected at the top of the gauge sending unit uses 2 copper washers, N 013 812 8 SEE PHOTOS of the 1990 200TQ 10V pump replacement parts.
Keep in mind that you should verify which pump you have and which pump you will need for a replacement, as the VIN split isn't an exact science and some 1989 Audi 200 vehicles before and after the VIN #KN067001 will require different parts.
The same applies to the 1989 Audi 100 after VIN # KN 100000 The 1991 200TQ 20V with 3B Turbocharged 20V engine, The original pump supplied in these cars was a 60mm Bosch unit that
is mounted in a twist lock plastic reservoir housing as shown below. The standard replacement pump shown by most US parts sources including
the Audi dealer, is the 43mm diameter version which requires additional
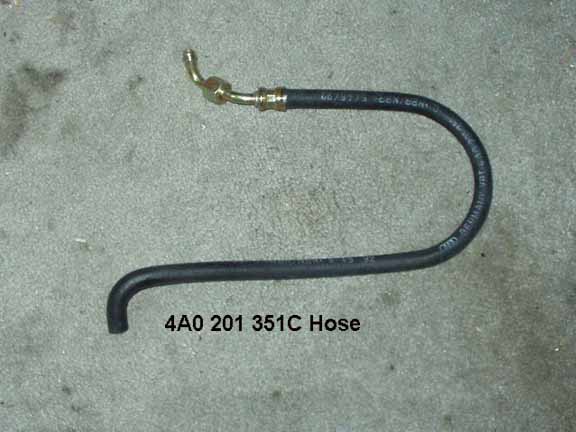
parts listed below. The 43mm replacement pump requires the following additional parts: New fuel hose with fitting to connect at the nipple on the pump.
You will also need to get a "Spring Pin Adapter" which allows mounting the smaller 43mm diameter pump inside the old plastic reservoir housing with screen. There is also the O-Ring that goes around the Spring Pin Adapter, if you can't use your old O-Ring from the original 60mm fuel pump, this N 904 644 02 Spring Pin Adapter (Plastic Adapter to allow 43mm pump to fit inside the original 60mm Reservoir) (12-22mm) crimp type hose clamp The latest Bosch 43mm replacement pump comes with a new 2 terminal black plastic connector with 2 spade terminals that will have to be crimped onto the existing fuel pump wiring after cutting off the original eyelet type terminals. INSTALLATION PHOTOS FOR THE 1991 200TQ 20V Pump There is another style of 43 mm replacement pump that requires a #6, 18 gauge wire eyelet crimp connector and a new 4mm nut for the positive terminal on pump There is also the O-Ring that seals the fuel gauge sending unit to the tank, N 901 833 02 that may be needed if it gets damaged. The fuel line connected at the top of the gauge sending unit uses 2 copper washers, N 013 812 8 OTHER NOTES: One person mentioned replacing 4 fuel pumps in 10,000 miles. I hope it was not because they made a little noise. I replaced my fuel pump at 110,000 miles to prevent any future breakdown. Now after 20,000 miles I do hear a little noise but most VW's and Audis I have worked on have a slight amount of noise coming from the pump. In my case the noise is a little worse when the temp is below 32 degrees F.
A clogged fuel filter will cause the normal pump noise to get louder and louder. Many fuel filters are designed to swell up if they get any moisture or water in them. The Oxygenated fuels that are used in the winter time may aggravate this problem as they can absorb any moisture in the tank. Even though the fuel filter change interval is listed at 30,000 miles, you may want to change it once a year.
If your fuel filter is clogging up rather quickly, you may need to have the fuel tank removed and cleaned and or recoated, or replaced if it has severe rust or excessive contaminates.
A problem with the fuel tank venting system can also cause excessive fuel pump noise, you may want to briefly run the car with the fuel tank cap off to see if the fuel pump noise changes. Any restrictions on the suction side of the pump will also cause noise and low pressure problems as the pump will tend to suck air from the inlet side if the hose between the tank and pump is restricted/kinked.
I have seen many mechanics replace fuel pumps only to find out the fuel filter was the real problem. This applies to any car that has an electric fuel pump whether they are fuel injected or carbureted. Running out of gas frequently also can be hard on the fuel pump as it uses the fuel for lubrication.
The fuel pump has been changed and improved over the years, so you may want to double check with the dealer to verify you are getting the latest version parts if you buy them from an aftermarket source.
The protective coating inside the fuel tank can come loose and clog up the mesh screen at the bottom of the fuel pump causing poor running or fuel pump noise. According to Audi service bulletins, the later vehicles do NOT use this coating anymore, the cutoff for the early vehicles is up to 1990 100 AND 200 Cars at VIN # 44KN017651. If you have a vehicle made BEFORE this cutoff date, the service bulletin describes a procedure for removing the fuel pump from the tank and cutting out the mesh screen from the bottom of the fuel pump to prevent future clogging.
The fuel filter may need to be replaced more often after this procedure is performed as the coating will now be trapped in the fuel filter element which may clog up faster than before.
Copyright © SJM Autotechnik™ , all rights reserved Return to Troubleshooting Tips page. Return to SJM Autotechnik™ main page.
|
| About Us Privacy Policy Terms of Use Links Customer Service Safety Information Home |