|
Miscellaneous stuff, Interior items,Technical Tips
My 89 200TQ has/had the problem (cloudy clear coat) with the dash and door panel wood trim. I removed the front dash wood trim pieces and used 600 grit wet/dry sand paper to wet sand the clear coat and then I buffed it with some "clear coat" polish for automotive finishes. The wet sanding removed the majority of scratches etc. and after buffing this process improved the clarity of the clear coat. It did not make it perfect but was much improved. You may want to try just using some of this clear coat polish first to see if it improves the look enough before going through all the work to remove the pieces from the dash, wet sanding, buffing etc. Keep in mind that this wet sanding/buffing etc. was a really messy job and it would be difficult to do without removing the wood pieces from the dash.
Be careful when wet sanding around the edges, I went through the clear coat in one small spot on the right edge. I have not tried to do the door panel pieces yet but it might be possible to do them without removing them from the doors. I'm told that there is finer grit sandpaper available for wet sanding automotive finishes (1000+ grit) which would be better than the 600 stuff. The only question is whether this buffed out clear coat will once again get cloudy over time and make this process a waste of time.
One thing that I have been wanting to try is to obtain a wood dash piece out of a wrecking yard car that is really clouded up and then try chemically stripping off the clear coat and then stain and clear coat it. If this was successful then I would do the existing trim on my car. I suspect the original coating gets cloudy due to UV ray exposure or just it could be just exposure to high temps that occur in the summer months. The later wood trim in the 91 200TQ sure looks much better with a nice "clear" clear coat.
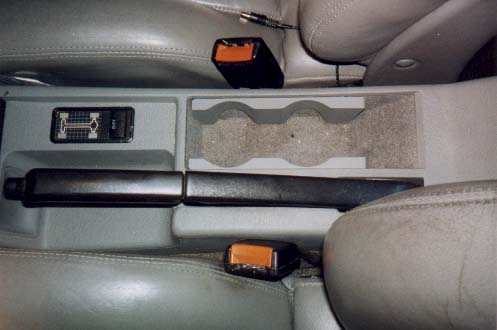
There is an Audi service bulletin that describes a cupholder retro-fit for the 1992 Audi 100. There are two and three cup versions. The cupholder consists of two halves that Velcro to the sides of the center storage tray. I ordered the two cup version (light gray) in the hopes that it would fit my earlier 89 200TQ storage tray. The color matched exactly and they slid right in even though they are a little shorter in length than the tray. Here is a photo of the installed cup holders.
They are designed to hold two 12 oz Pop cans or the narrow ends of a large soda cup. They have tangs that slide under the top lip of the storage tray and then you pivot the piece down so the Velcro backing holds them to the carpet in the tray.
The part numbers for the 2 cup version are 4A0-862-534A (+ color code) and 4A0-862-533A. The parts info shows that these are designated for 1992> Audi 100 Vehicles that have the Telephone installed.
The color codes that should be added to the end of the listed part number are: R01 (Ecru or beige) 2XB (Travertine or beige) 7DN (Platinum or gray) 9XB (Anthracite or black)
Also shown in the parts listing is the 4A0-862-533 and 4A0-862-534 (3 cup) version that "may" also work, but I have not verified fitment in the older 1989-91 100/200's
There may be a version available for the early V8's as I saw a 93 V8 with a center cupholder setup. (NOTE: The ones for the Audi 90 may fit a little better in the early 200's, but I have not verified this)
REAR CHILD SEAT ANCHORS, 1989-91 100/200,1990-91 V8,1988-91 80/90 (Later Audis as well)
There is a technical bulletin that may be useful for those Q-listers with children. This bulletin mentions that three additional child seat anchors can be added to the rear parcel shelf on the 1989-'91 100/200's and on the 90-91 Audi V8's. There is also a bulletin that covers the 80 & 90 Models 1988-91 (Group 68 91-05) The latest Bentley Manual for the 1989-91 100/200 shows these anchors in group 68.40.
On the 100/200/V8 If you look in the trunk area underneath the rear parcel shelf you should see three sets of mounting locations, one in the center and two on each side. These mounting locations have one large hole in the center and three smaller holes already punched in the sheet metal.
The top of the rear parcel shelf needs to be notched (cut) to allow the following parts to be installed. Basically the installation involves pop riveting a large support washer from the trunk side and then bolting a bracket from the top of the parcel shelf. There is a trim cap that covers this bracket.
100/200 parts list:, 443 887 301 (Cap or Cover for rear parcel panel that can be installed
when anchors are not in use) 443 887 301C 01C (Cap in black) which covers the metal Bracket N 010 240 22 Mounting Bolt (M8x20MK) 443 887 269 Bracket N 905 763 01Pop Rivet (dimensions A4x9x8x1.2mm) qty 9 used 810 019 829 Spacer (for mounting bolt) 11.2x17x8.5mm dimensions 443 887 077C Washer (main support washer shown for Canadian vehicles?, check with Audi) The 80&90 and later Audi Models may also use alternative parts.
Gas Struts for Trunk Hinges, 1986-88 5000TQ, 1989-91 100/200,1990 V8
There is an upgrade available to add gas struts to the rear trunk hinges and remove the garage door springs currently used.
Service bulletin, GROUP 55, # 91-04 (June 1991) shows the following parts: (There may be a newer bulletin on this)
2 gas struts 441-827-551, 4 ball studs 533-827-345C, 4 M8 self locking nuts, 4 flat washers, 8.0mm (5/16).
Are you tired of getting your head banged from the trunk lid latch when parked on a steep incline?
I have not done this upgrade (yet) but 2 quattro list members have done this upgrade, one owns a 87 5000TQ and the other member did the upgrade on a 1991 200TQ. They offered the following installation tips.
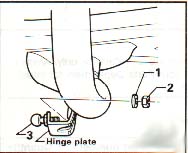
The procedure involves removing the plastic trunk liners on each side and then remove the existing trunk spring and remove the plastic bushing on the trunk hinge bar. Install the ball stud into the hinge plate as shown here.
Install the strut on the hinge and then prop open the trunk to allow marking the location of the hole that will be drilled in the welded wheel house seam.
NOTE: When choosing the front ball stud mounting hole location, make sure the trunk lid will open and close fully before the strut gets fully extended or compressed.
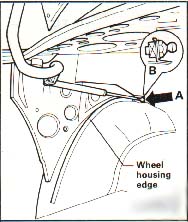
Next step is to drill the hole in the seam to mount the front ball stud. Take care not to drill into any wiring in the area. This photo gives some details on where the strut is mounted.
Trial fit the strut to the newly mounted ball studs, and test the setup by slowly opening and closing the trunk. Make sure the wiring harness to the trunk lid has enough slack to avoid interfering with the new strut. Next you will need to remove the strut and trial fit the plastic liners back in the trunk and mark the location of the hole that will be cut in the plastic liner to allow the front ball pin to stick out after the liner has been re-installed. Install the strut after re-installing the liners on each side over the front ball studs. Apparently the V8's after July 1990 build date already have this strut upgrade.
No more head banging!
Copyright © SJM Autotechnik™ , all rights reserved
Return to Troubleshooting Tips page. Return to SJM Autotechnik™ main page.
|
| About Us Privacy Policy Terms of Use Links Customer Service Safety Information Home |